
So I see a lot of questions about swapping out the speakers in WRX/Impreza models. Not much is different in the front of the cars, but this thread will focus on the 08+ models rather than the earlier models.
The biggest thing to understand is that you can’t just yank off the doors, drop in speakers, and call it a day. If you add more power to the doors, the speakers move more. more cone movement equals more metal reverberation, and that means distorted sound and less efficient reproduction of the music.
Let’s skip over proper (or even basic) sound deadening (it has been covered a few times in here and in car audio forums) and focus on the mechanical aspects of upgrading door speakers. Door disassembly, speaker replacement, adapters, spacers, wiring, etc. Just the basics.
Door Disassembly:
First up, I found digital copies of how to disassemble and reassemble the doors, both front and rear. There are a few minor errors (more below), but overall, the directions are pretty good and there is not too much to be added.
First off, here is an electronic “How-To” from an online vendor. It should help get you started:
http://carstereoadapters.com/wp-content/uploads/2012/01/08-x-Impreza-Master-Sheet.pdf
Figure 7 on the Front door diagrams shows the rear door. No big deal.
I found another good thread with some real pictures. It may be good for more info:
http://forums.nasioc.com/forums/show….php?t=1891166
Also, I always recommend grabbing plastic prybars from somewhere cheap like Harbor Freight or the local discount auto parts store. They are cheap from HF if you are ordering other stuff, but you might as well buy them locally if you are in a hurry or if they are all that you need to buy. You can see them used to remove the armrest in the pictures above, but they are also good as a panel popper, and for removing the trim around the headunit.
Anyway, the basic disassembly instructions above are pretty good. At least look them over before taking the doors apart.
First off, I forgot to take a picture of the back side of the door panel to show the location of the door pins. This is REALLY helpful for people doing door speakers, because if you know where they pop spots are, you can pull in the right places.
There is no secret to successfully removing the door panels without feeling like the car is about to break. You can use the special plastic or metal door panel tools, and they sometimes help. The real trick is practice. You WILL feel like the door panel is about to break, especialy your first time removing the panel (and/or the first time opening up any door). If you are to nervous, go to a pick-and-pull that has a car of the same make and the same or a similar model and practice there. Don’t kill the car for the sake of it, but get familiar with how they come apart.
What I did get a picture of was the underside of the armrest assembly. Knowing where the retaining clips are located will make it easier to know where to apply pressure.

After getting the armrest off and popping the panel, you have a couple of choices. I try not to remove the lock mechanism and handle assembly unless absolutely necessary. When I am doing a full deadening, I usually pull it all off, but for the speaker install and basic deadner install, it was not needed. I just used a soft cloth to rest the panel on and worked around the panel.
Tweeters:
The first thing that I did was to remove the stock sail panel. To show where the stock clips are located, I took a side-by-side pic of the sail panel and of the location where it clips into place. Note in the picture below that I had not removed the metal clip that goes in the center hole. It is the silver/metal part in the middle of the door. You have to remove this from the door and put it on the post on the sail panel to reattach the sail panel. Don’t forget to do this, if theat seperates from the sail panel.
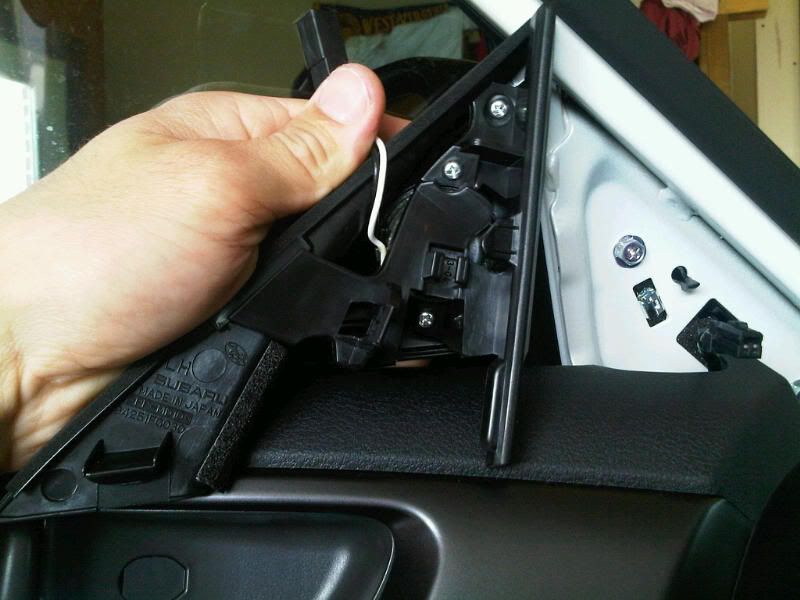
On to actually mounting the aftermarket tweeter into the stock tweeter housing. While this was my greatest fear about the install (and the greatest unknown until I got the door apart, it ended up being the best part of the install! The Rainbow CSX 265 set comes with the CAL 20 Silk 20mm silk (duh) dome tweeter.
So the big question for a lot of people wanting to use aftermarket components is whether the tweeters will fit in the stock housing. While a little caulk or hot glue will help position a smaller tweeter, and while a Dremen and/or file can enlarge the stocl location, many people just don’t want to permanently hack into the stock parts. Just an FYI on that- the stock parts for the sail panel assembly are fairly cheap, and even getting a set of sail panel blanks and surface (or even flush, depending on the tweeter depth) mounting tweeters there would work for many people.
The stock tweeter is somewhere in the 1″ range, which leaves a lot of options. If you look at how the stock assembly is in 2 parts (plus the actual driver), it becomes apparent that a little caulk and some space filler (foam tape, plastic, etc.) would allow most tweeters under 1″ to work in the stock location.
Knowing this, I figured that the 20mm CAL 20 would be fine in the stock location, even though I might have to do some space filling to make it work without any excessive movement.
Below is a picture of the stock housing, the stock tweeter, and the CAL 20 aftermarket tweeter.

I test-fit the CAL 20 in the stock location and the tweeter was a perfect fit. Not a close fit- a PERFECT fit. When the tweeter was placed in the ring where the stock driver rests, there was no movement from side to side. This was awesome.
My next step was to reassemble the stock assembly to see how the depth worked out. I had a small gap between the back of the tweeter and the rear part of the housing assembly. I knew that I woudl need to fill this with something to hold the tweeter in place. Step 1 was to lay a really thin bead of caulk around the mounting ring of the housing, then to press the CAL 20 into place in the housing. This would reduce the likelihood that that the tweeter would have any movement, particularly once I added something to the back of the tweeter to hold it in place from the back. The caulk that I used was clear (it looks white in the picture but dries clear).

I then pressed the tweeter in place, being careful to position the tweeter wires in the direction where I wanted them to go.

The next step was to cut a small (5/8″ x 5/8″) square of foam adhesive weatherstripping. This is about 3/8″ to 1/2″ thick, but compresses well. Once I affixed it to the back of the tweeter, I replaced the back of the stock tweeter housing and reinstalled the 3 mounting screws. Once this was done, the tweeter was locked into place. From the front, it is completely invisible.

Midranges:
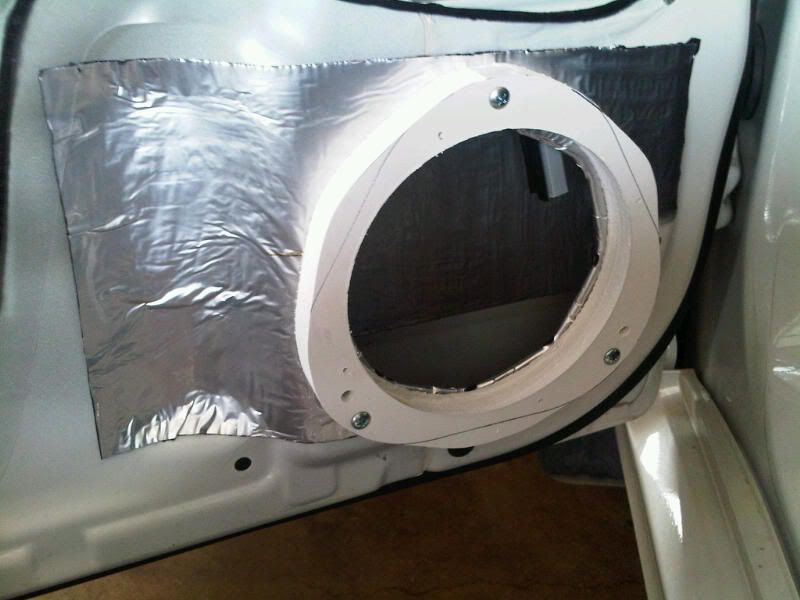
The midranges were very easy to install. The CSX midrange requires a 143mm (5.63″) cutout diameter, so I made yet another set of PVC spacers/adapters (PM me if you need a set made) then marked and pre-drilled the mounting holes to attach the midrange to the spacer.
Once that was done, I cleaned the mounting area well with a degreaser, then took a small amount of deadner and applied it to the mounting area. This functions as both deadner and as a gasket for sealing the spacer to the inner door skin.
First, I cut a pie-cutout in the deadner and folded the excess around the back of the inner door skin. Then, I applied a single layer of deadner to the outer door skin immedately behind the speaker location. This may not do much, but it does not hurt.

Next, I used (3) 1.5″ #10 sheet metal screws to attach the spacer to the door skin. You want to use a #10 sheet metal screw, but for length you can use 1-1.5″ without any complications. I usually use 1.25″ screws with my 3/4″ spacers, but I only had 1.5″ #10s handy. I had a picture of all of the fasteners that I used, but the 10-picture limit is killing me.
Finally, you want to attach the speaker to the spacer. I used 1/2″ sheet metal screws, but you will usually get mounting screws with your speakers. Whatever you do, PREDRILL YOUR MOUNTING HOLES! This will prevent stripping or cracking. Predrill the holes based on the shank/body size of the screw (not the thread size).
Next, you want to pull your wires to your crossovers and slide the midrange into place.
You can’t see it too well, but I used another layer of deadner as a front gasket. I cut a 1/2″ wide strip and made relief cuts, then curved it to match the curve of the spacer, then I sandwiched it between the speaker and the spacer. After that, I tightened it down.

That was it for the midranges. With the right adapter/spacer and the right wiring, mounting them up and running the wires is as simple as installing coaxials.
Wiring & Crossovers:
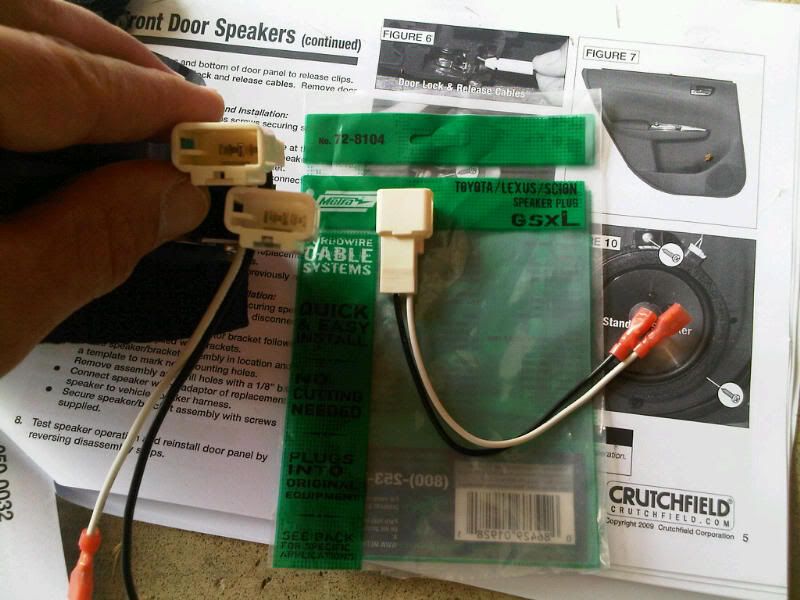
If you are not running an amplifier, and thus are re-using the stock wiring, the easiest and most solid way to do the wiring is to use a wiring adapter. I bought mine on Amazon for $7 shipped, but you can get them at Best Buy, Crutchfield, etc. The harness that I used is the Metra 72-8104. According to crutchfield, the 2011 requires 2 pairs of the 72-8104 adapters (1 pair front, 1 pair rear). I only did the front speakers for now.
I also have a comparison of the Metra harness to the stock speaker input, but they are the same. That is what makes them useful adapters.
I connected the Metra harness to the stock wiring, cut the spade connector ends off of the adapter, and ran the positive and negaties wires into the inputs on the Rainbow crossovers. From that point, I connected the tweeter wires from above and the midrange wires that I had pulled up from below. I know that the tweeter wires look ugly in their zip-tied condition, but the tweeter wires are soldered to the tweeters, so until I have everything finalized, I did not want to cut off the excess wire.
Mounting the crossovers was pretty straightforward. I mounted them horizontally up under the lock/handle assembly, righ tin the area where the door panel bulges outward to contour to meet the dash. I first tried to mount it vertically and a little bit forward, but the location interfered with the panel. I tried to move it backward but there were structural impediments. After some playing around, I ended up turining it 90* and mounting it in the location below. I attached it with (2) 1/2″ sheet metal screws.
From there, I ran my wiring to and from the crossover, tightened it down, and wired it up.

Rear Speakers:
Against my better judgement,I decided to pick up a pair of Polk dB651 coaxials. Crutchfield had them on special price ($60/pr, shipped, with the wiring harness) and Polks were buy-1-get-1-half-off, so my brother and I split 2 pairs.
I figured that they’d be a modest upgrade at best, btu I was wrong (more on that later).
For now, just some pics of the install…
Speakers and adapter:

Spacers:
![]()
Partial door disassembly:

Underside of handle assembly (note clip location):

Interesting…

Weatherstripping gasket applied:

Installed:

Some details:
Spacers/adapters:
Why do you even need door spacers or adapters? Well, your stock speakers have an odd shape. They speakers are contoured to fit the door, and the mounting holes are 3 holes in a roughly triangular shape where the screws go into a nylon insert (as opposed to the inner door skin). This helps prevent the screws from backing out too easily. This is a good thing, so you should try to re-use the stock mounting points. This means that you need some sort of an adapter, because aftermarket speakers typically use 4 mounting holes that are on a different mounting pattern than the stock circle.
In addition to an adapter for the mounting holes, most aftermarket speakers are more robust than the stockers. This means bigger baskets, bigger magnets, and an overall deeper profile. Sometimes, the basket diameter is much larger than the stock ones. You need an adapter that has a larger cutout diameter.
You will also need something that will allow your window to clear the larger magnet assembly on the back of aftermarket speakers. For this, you need a spacer.
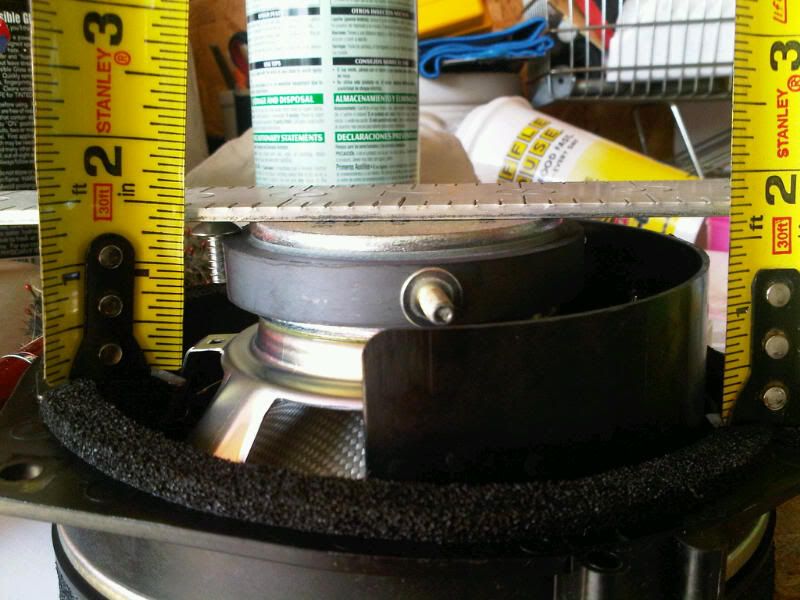
Here is the stock mounting depth in the picture below. As you can see, not very deep. If you don’t have a spacer of some sort, you pretty much have the depths below to work with. Really, you only have 1.5″ (the shallower depth), because the OEM bracket is angled.
EDIT: I forgot that there is a little space between the window and the OEM speaker, so your max depth (with out a spacer) would be more than 1.5″ and WITH a spacer should be fine for most common speakers. Somewhere in the 2.5-2.75″ range seems about right. If you have doubts, break out the tape measure and get a reading from the door skin to the window, when it is down (I’ll try to do this when I re-open my doors to do more deadening).
Also, I disassembled the OEM bracket to see if it can be reused, but it only allows for a mounting diameter of 4 13/16″ for a speaker to drop in. You COULD modify it, but I would not. At the end of the day, it is still flimsy ABS plastic, and once modified you can’t ever take it back to stock.
No matter what adapter/spacer you get, plastic or a synthetic, non-porous material is preferred. You can get them made from wood, but even if sealed, they can rot, split out, warp, or even mold. This is not a good thing.
As far as type of plastic, you can get injection molded plastic, but it tends to be thinner and more brittle than other options. The preferred material is PVC (just like the pipes) or High Density Polyethylene (HDPE). Either of these are strong, dense, and will withstand the rigors of being in car doors.
You have 2 main options here: DIY or buy a set.
For more information on spacers or mounting adapters, please see the Speaker Spacers section of this site:
http://www.subaruaudio.net/subaru-speaker-spacers/
I make them for many Subaru Applications, so contact me if you need a set made and don’t want to DIY.
Here are some that I made, which I finally installed recently. Obviously, this is without the speaker:
Wiring:
You will need to either run new wire from your amplifier/headunit to your speakers, or you can use the stock wiring (definitely fine for running speakers off of the HU).
If you re-use the stock wiring, you will need an adapter to get from your stock connector to the terminals on your speakers. You can get them from Crutchfield, BestBuy, etc.
According to crutchfield, the 2011 requires 2 pairs of the adapters below:
You need Metra 72-8104
http://www.crutchfield.com/S-KZKAOxD…Harnesses.html
If you decide to add an amp, you’ll need to add wiring from the amp to the speakers in the door, wither direct with a 2-wire traditional speaker wire (for coaxials or if you have components with the crossover in the door) or a 4-wire setup if you put the crossover in the passenger compartment. In-wall speaker wire is good for this. You want a 16/4 wire or a 12/4 wire, both of which are 4 insulated wires in a single sleeve. 16 gauge is smaller than 12 gauge, FYI.
Large zipties are good for snaking the wire through the stock wire boot between the kickpanels and the door.
Vibration Control and Deadening:
Subarus in general seem to have a terrible vibration issue with component (parts, not just speakers) in the doors, particularly behind the door panel. This has been covered time and time again, so I won’t rehash.
It is amazing what can be done with very little foam weatherstripping tape. Truck cap/camper top tape is also a good way to go for this.
No matter what method(s) you employ for noise control, the key to a good application is good surface adherence and a clean, dry, grease/oil-free surface to which it will be applied. I use Windex Vinegar as a cleaner, but you can get any good automotive degreaser to clean things up. I also try to wipe things down with alcohol (or even white vinegar) right before I apply the noise control.
For more information, please see the Deadening section of this website, including some vehicle-specific examples:
http://www.subaruaudio.net/tools-and-how-to/deadening/
PARTS:
Rear door sail panel replacements:
Almost EVERYBODY breaks these removing the rear door panels. The only way not to is to be uber careful (not easy until you can actually see the back of them to know what you are working with) or to do what I did on my passenger door and just work UNDER the door panel without removing it. For basic deadening and a speaker install, this is not an issue.
If you break them, the parts can be bought from a dealership. Part numbers are 94251 FG040 (Right) and 94251 FG050 (Left). List is $9.18 each. I got them for a little less than that from Annapolis Subaru (See the “Links” page for info).

“JDM” Bezel for Impreza, WRX, STi, Forester, etc.:
This is a desirable part for aftermarket stereo installs because it eliminates the gap around an aftermarket radio without a filler panel AND it allows you to use the metal OEM mounting brackets as opposed to the plastic ones that come with a dash kit. If you are buying a headunit from a place that does not include a free dash kit, save the ~$20 on the aftermarket dash kit and get the JDM bezel.
You used to only be able to order these from special importers at a huge markup, but some innovative people found that there is a USDM part number for them:
66065 SC130
SVXdc discusses it here:
http://forums.nasioc.com/forums/showpost.php?p=29279431
Again, I recommend Annapolis Subaru for the part.
Flat (non-tweeter) front door sail panels (for surface mounting of tweeters):
I you are looking for blank plastic sail corner panels (as opposed to panels with a grill for the stock tweeter) the part numbers you need are:
94251FG000 (right)
94251FG010 (left)