
Click on any of the subsections below to expand the content.
Speaker Wiring Adapters
If you are not running an amplifier, and thus are re-using the stock wiring, the easiest and most solid way to do the wiring is to use a wiring adapter. I bought mine on Amazon for $7 shipped, but you can get them at Best Buy, Crutchfield, etc. The harness that I used is the Metra 72-8104. My 2011 WRX requires 2 pairs of the 72-8104 adapters (1 pair front, 1 pair rear). I used them without issues.
Many other current Subaru models use the same connector, which is listed as a “Toyota” connector. Don’t worry- it is the right one. The Current Forester (09+ for sure, maybe more), Legacy (2005 and newer), BRZ (2013+), and WRX / STi / Impreza (2008 and newer) models, as well as the Scion FR-S and Toyota GT86 use the 72-8104 for the doors.
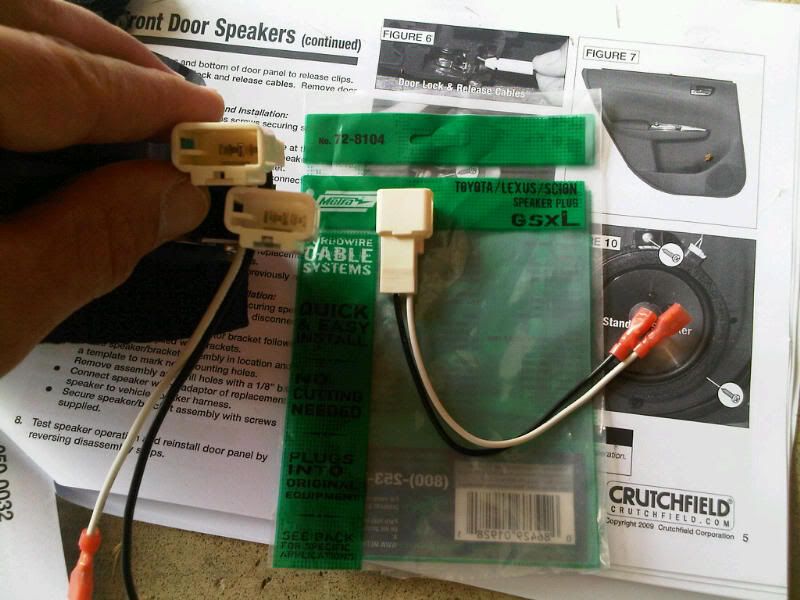
More on other adapters as I get the info. I just got a Metra catalog from them in the mail…now I just have to find the info and post it. Somewhere, I have a picture comparison of the Metra harness to the stock speaker input, but they are the same. That is what makes them useful adapters.
Earlier models primarily use the Metra 72-930X models.
Metra 72-9300 versus 72-9301:
Discussion: http://forums.nasioc.com/forums/showthread.php?t=2058314
Credit JarHarms on NASIOC for pictures and content:
Some people have encountered conflicting information on what installation harnesses are needed for certain Subaru vehicles. In particular, internet searches have issues with the Metra 72-9300 and the 72-9301. Getting the wrong one results in reversed polarity- not favorable for the best sound.
The speaker harness references kept coming up with Metra p/n 72-9301 and 72-9300 along with notes of proper/improper polarity. The Metra Online application guide did not show any p/n’s for the speaker harnesses. You can look the individual p/n’s up on Metra’s website.
For the GD chassis (as well as many other Subarus) the radio harness was easy enough; Metra p/n 70-8901 shows up on the application guide at http://www.metraonline.com.
Keep in mind that there may be varied wiring from Subaru to Subaru and year to year. If you have questions about the polarity of your stock wiring, check it yourself with a DMM. When holding the speaker connector horizontal, the – is the positive terminal and the | is the negative terminal.

Reversing the polarity may not be a problem as long as you are wiring all of the speakers the same way. If you have a subwoofer you would also need to keep that similar to the speaker polarity. Sound quality problems arise when you have a mismatch of polarities. (Someone more knowledgeable than me can send me a message to clarify this point.)
For those upgrading only two speakers, it is important to match the OEM polarity.
It has also been reported that one of the Metra p/n’s might not fit correctly to the Subaru connector due to a difference in terminal width or pitch. As long as you bend the connector locking tab out of the way, both Metra harnesses fit into the Subaru speaker connector. The terminal width and pitch are not a problem as far as I could tell. The Metra connectors are pretty sloppy so you might need to wiggle them to fit.
The 72-9300 harness has the polarity matching the car wiring that JarHarms tested. When holding the 72-9300 connector vertical, the | is the positive terminal and the – is the negative terminal. The 72-9301 harness has a reversed polarity. When holding the 72-9301 connector vertical, the | is the negative terminal and the – is the positive terminal.

In this case, the 72-9300 harnesses were the correct ones for the front door speakers. If you got the wrong ones (or bought 2 sets like JarHarms and want to convert one adapter type to match the other pair), you can convert the 72-9301 harnesses into 72-9300 harnesses. These are connectors made of bodies and terminals that come apart.
Using a narrow pair of needle pliers you can squeeze the contacts to free the terminal from the connector body. After that a simple position switch and re-installation will make these 72-9301 harnesses in to 72-9300 harnesses. It easily would work the other way around as well.
Starting with a 72-9301

A pair of needle nose pliers can squeeze the terminals.

Terminal removed. This picture helps illustrate what you are doing to release the terminals.

Just swap them around and reinsert and you have a 72-9301 modified into a 72-9300

Wiring the Amp to the Front Speakers Using the Factory Wiring
I’ll make it a straightforward as possible…
One important note for n00bs: The larger the wire, the smaller the # associated with the “gauge” of the wire. 20ga is larger than 22ga; 4ga is larger than 8ga, etc.
So if you get the HU and the amp at the same time (and install them at the same time) and you want to re-use the OEM speaker wire to the doors, what you want to do is:
Wire up the harness that came with the HU to the 20-pin adapter harness, but DON’T wire the speakers from the HU into that harness.
From the HU, you will run an RCA cable and a small (18-22 gauge is fine) 12V “turn-on” wire (it will be blue) from the HU harness to the amp. I ran this through the center console to under the seat.
You will also run some aftermarket speaker wire (16 gauge is enough) from the amp to behind the headunit. You will connect these wires to the wires in the 20-pin harness that go to the speakers.
The “extra” wires on the 20-pin harness are associated with the BT steering wheel controls. follow svxDC’s directions on what to do with those.
You will ground the amp and run a larger power wire (10 gauge up to even 4 gauge) to the amp from the battery.
Here is how/where I ran mine in my personal vehicle:
First off, the final install picture as it sits under the driver’s seat:

All wires are tucked away.
Signal cabling is a Monster Cable 4-channel XLN that is a little too long, but excess was minimal. It runs down the length of the center console and is tucked in under the carpet to run to the amp’s 4ch inputs. The remote turn-on lead follows the same path.
Running the Power and Ground Wires
Power comes via 8 gauge Knu cable from the battery terminal, under the battery and then up to the fender (where it is fused), then behind the fender liner and into the driver’s side kick panel. From there, it goes down the stock cable channel and runs under the carpet to the amp.
Fuse location:

Gromet behind fender liner:

Same Gromet from the inside, carefully pierced with a screwdriver:

I passed the ziptie through the gromet and secured the wire to the ziptie to pull it into the passenger compartment. Here is the power wire taped to a ziptie, then doubled over to secure it for passage through the grommet:

Pulled through the grommet from the inside:

Down the OEM channel (it was pulled tight before being closed up):

For grounding, I used this bolt near the OEM underseat vents. I scored the paint off of the metal and re-used the OEM bolt. At first, I had concerns over the solidity of the mounting point, but it gave adequate conduction.

By the way, when removing the seat, you have to detach these 2 plugs.

One is a press-clip, while the other is a slide clip. I removed all 4 seat bolts, rocked the seat forward, and disconnected them. Also, when I replaced the seat I flipped the plastic piece that holds these two and located it above the metal bracket. Just squeeze the wings on the clip, remove it, and relocate it above the bracket. It is hard to describe but will make perfect sense as soon as you look under the seat.
4 thoughts on “Wiring”
Comments are closed.